top of page

Week 1 Semester 2
Introduction to Unity
Interface Overview and Object manipulation


In the first lesson I created my first project. When I first open unity I looked around and familiarised myself with the user interface overview. The interface overview has different windows/view such as Game view, Scene View, Project, Hierarchy and Inspector window. Scene view is where you build your game.
You can add games objects, characters, cameras and lights. Main camera and directional light comes as a default when you first create your project they can be found bellow the Hierarchy inside a SampleScene drop list. Hierarchy contains all the objects that are used. Game view is where you can see a preview of your final game. Project window is where you manage and access your assets. Inspector window displays information about any selected object and it can also be used to change objects properties.
I made changes to my layout by clicking where it says default (next to layout) and changed it to 2 by 3. By doing that I am able to see the live render of my game while creating it.
The purpose of the section was to get familiar with unity by learning where to find each sections of the software, what they are used for, how to fix simple error that it might occur and how project are create and saved.

This is how I created a cube for the first time. The Tools Ribbon can be used to manipulate the objects .
Tools Ribbon
Hand Tool - can be used to move from side to side and up and down
Move tool - allows you to move the selected object
Rotate tool - enables you to rotate the objects around
Scale tool - scales the objects
You can also make use of the shortcuts
W - Move
E - Rotate
R- Scale
By clicking on the Scene Gizmo on the top right you can change the view of the scene

I made use of plane , cube and sphere to complete the task and saved the scene by selecting file/save scene as. To duplicate the objects I used Control + D

Screenshot 2019-02-21 at 17.17.46

Screenshot 2019-02-21 at 17.20.09

Screenshot 2019-02-21 at 17.37.15
Screenshot 2019-02-21 at 17.17.46
1/7
After creating a new project I added a plane and adjusted its scale to[X10,Y1, z10]. A new asset was imported by clicking on [ Assets, import new Asset] and then the FBX file was selected.
I used [control+D] to duplicate the buildings and then they were positioned differently . To colour the asset a new material was added [ create/material]. In the [Albedo] section I changed the colour the dragged the material and placed it on top of the asset. I repeated the same actions several time to make sure all the buildings had a variety of colors. After that was done I added different lights and played with their settings.
The purpose of this lesson was to learn how to save and create new scene, import different assets, adding different color material to different objects, how lighting works and how they can affect a scene.


In this session standard assets were imported to unity to help with the creation of an island.
The purpose of this session is for me to learn how to manipulate the terrain to get different shapes and sizes, adding grass, sand, trees, water, how to minimise and set sizes for the grass and trees.


The purpose of this task was to learn about snapping tools and how to change the look of different materials.


In this session I learned that the feature called skybox is wrapped around your entire scene and that it shows what the world looks like beyond mine geometry. You can create your own skybox by adding a new material and changing the colour of the Sky Tint and Ground or by adding a 360 image of 6 different images.


In this session I created a cube rotated it and used UV-Test- Grid to experiment with it. A normal map, height map and a texture map was added to colour in the emission column to see how they effected the shape of the cube. After importing the assets I dragged and dropped a rabbit in the scene and created a new material that was later assigned to it. I played around with colour metallic, smoothness and transparence to give different looks to the rabbit. By adding different texture into the colour in the emission section you can give different effects to the object.
The purpose of this session was for me to learn how by calibrating a shader by changing certain setting and adding textures, hight maps, normal map can effect how an object looks.


In this session a new project was created in unity. Particles were added to the main scene. With Particles one can create different effects such as fire, snow, water and many more. Particles System can be simulated in the scene without running the game by using the controller (Particle Effects) that pops up, once you select the particles. Under the Particles System Module one can change the speed, colour, rotation size and more. In this section I created fire and snow effects. For today task I added a tail renderer to a 3D cube and a material with rainbow png was insert in the trail renderer.
Week 4


In this part of the section I imported unity particle pack and analysed it by walking thought the scene. I was able to see how the particles were created and how effective they were.


In this part of the section, I attached particles to objects by changing the shape of the particles to mesh and adding the Stanford Bunny. I experimented with different settings such as start speed, size, emission and colour over a lifetime to see what I could achieve and the results were very nice, especially when I change the background to a solid colour, instead of the skybox. The goal of this section was for me to learn how particles are created and the different used they can have.


For this part of the section a new project was created in a 2D template. A 3D cube was added to the scene then a C# Script (BasicOutput) was created and added to the cube. The C# Script was edit in the visual studio. The purpose of the section was to learn the anatomy of the class, Basic Output, variable, string and to learn the right way to code.


Week 5


Week 6 Test


For this essay, an Underwater Environment was created by modifying the assets that were provided and arranging the scene in a visually appealing way.
A solid color (turquoise) was used for the background and the same was added to the fog color to give the impression that the scene was underwater.
Having the same or similar color, makes everything fade in and more appealing. A directional light was used, but the intensity was left on low to give the impression that it was a deep sea.
The shadows were set to distance Shadowmask, hard and soft, and 200 shadow distance. By doing so as the ship distance itself from things such as the plants, it took longer for the shadows to fade away. Materials were used to change the color of pants, rocks and the ship. Different particles and texture combined to create bubble particles that were used in the scene. Post-processing such as Vignette, Bloom, Depth of Field and Color Grading were added to the main camera of the scene to simulates different illusions or effects.
Week 8
Task 1


For this task I had to recreate a title screen for a game. Assets were imported to the scene and after that they were arranged accordingly with the requirements. I put the assets in the correct sorting order by changing the index value. The camera was set to the correct size and the aspect ratio was set to 16:9 I was able to complete the task.
TASK 2


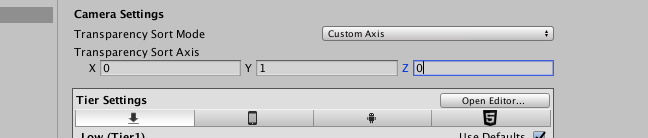


The main purpose of this task was sorting the Y axis(0,1,0). I imported the presented assets, added them to the scene, changed their axis by going to project (settings, Graphics) and changed from default to Custom Axis and the transparency sort axis to (0,1,0). The point of passage of both the bee and the berries. That was done by selecting the the Sprite Editor and then changing the pivot point.


In this part of the task I added Sprite Mask to the bee the I deselect the Sprite Renderer and then changed the Mask Interaction of one bush to Visible Inside Mask and the other to Visible Outside Mask. By doing so the bee became invisible and every time I played the scene and moved the bee on top of the bush I got different effects.
Camera and Chroma Keying


In this part of the sect ion I created 3 cubes in a 3D scene and changed the background to solid colour. By selecting the Don't clear option in Clear Flags the solid background was not rendered and each time the camera moved around the objects the background did not clear the previous frame, making it look like the frames were merged.
The main background was duplicated and the Clear Flags were change to solid colour, that resulted in the two cameras rendering a object with a background and another without. If nothing is selected in the Culling Mask dropbox in any of the cameras, only one will the rendered. By changing the x, w, y and H under Viewport Rect I was able to slip the display into different view point. Other options such as projection, field of view and clipping panes were used to change how far the camera could go, positioning and what you want the camera to show.
This section allowed me to learn more about the camera settings and how they can be used to adjust the display, add ,remove or hide things.
Week 9
Unity Lightweight and Shadergraph


I installed the Render-Pipelines and the Shader Graph and explored it functions.
Lightweight


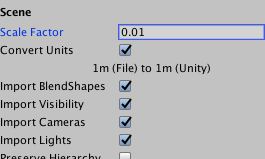


For this task I created a new project and selected the Lightweight RP (Preview) after the demo scene loaded a new scene was created. A FBX bunny model was imported, rescaled to 0.01 and then it was added to the , main scene. A material was created and automatically the default shader was (Lightweight RP/ Lit shader). I created a new unlit Graph shader and then opened the Shader editor and created a new node for color and connected it to the Unlit Master color (T). After Saving the asset the next thing to do was changing the shader, by going into , (Shader ,Shader Graphics myFirstShader) and then assigning the colour to the bunny. The unlit Shader do not feature lighting or shading , it has a flat colour, they are usually used for objects that do not need light or shading. The same process was used for a lit shader but the only difference was that the shader selected was PBR Graph instead of Unlit graph and the color was connected to Albedo.


The main focus of this part of the section was to learn how to convert colour into property (by right clicking and selecting convert to property), change the object opaque to transparent (under PBR Master settings) adding a slider and connecting it to the Alpha(1) and converting it to property in order to be manipulated out side the shader editor or a slip node can be added (slip node(In (4) connect it to colour and then (A(1) ) to Alpha (1). That way the transparency can be changed thought the alpha channel outside the Shader editor
Inside the property the slider was set to 1 as a default to make sure you can see the object before the transparence is changed.
Mixing colours


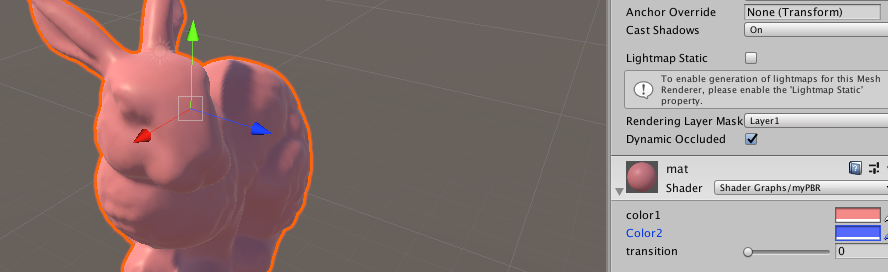


In this part of the section I learned how to combine two colour or more. After inserting the bunny in the main scene and adding a material to it, a PBR Graph Shader was created.
In the Shader editor I created two colour nodes, converted them into property, added a Add node that was used to join them together and the Add node was them connected to PBR Master (Albedo).
Outside the Shader editor the material shader was changed myshader in the Shader Graphics section. By doing so I was able to mix different colours to get new ones. Another way of mixing the colours was by adding multiply node and connecting it with the colour nodes and Albedo. By doing so the darker colour dominated. I tried changing the top and button colour and the darker colour was more visible. The only thing I was able to change at that moment was the brightness. But by making the colours softer I was able create a new colour.
After that I created a Slider, converted it to property and also I adda Lerp node connected them together and them linked the Lerp to Albedo. That created a slider and every time a moved it to one side or the other the colour would change depending on the percentage. By adding and connecting a Position and Slip node and linking them to the colour node, every time I moved the bunny in the Y position the colour would be slip or there would be more of one colour. If the position node Space was changed to object instead of world the colour would stay the same even if the bunny is moved.
ShaderGraph Texturing


For this task I learned how combining nodes such as Texture 2D Asset and Sample Texture 2D can allow me to control the appearance and action of any 2D texture. After connecting different nodes together and arranging the texture I was able to create a illusion that the grass image was a moving 3D asset. To get this result, one of the procedure was creating a material(mat) and assigning the Shader Graphs to it. By doing so I was able to add different controls to the material that were used to change colour brightness or adjusting wind power.

Shader Recipes


In this section I used different recipes to create different effects with the help of Unlit and PBR Shaders.
Shader Graph Shaders


I analysed and played with different types of created shader. Now I have enough knowledge to create a similar effect because I looked at how they were created.
Graphical Optimisation


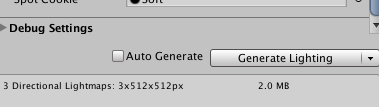

In this session I created a plane, scaled every axis to 30 and added a checker asset to. A fern object was added in the scene and a texture was added to it.
The resolution of the texture was set to 128 x 128. Two spot lights was added to the scene and the directional light was set to 0.2. Both the models and Plane was set to Static, all lights was set to baked and the Debug Settings was manually generated. The light should have been baked into the texture, but I had a different result.

LOD (level of detail)


In this task I learned how to add a LOD Group to a GameObjects to make sure that depending on how far or close the camera is from the object the level of detail would change accordingly.
Basic Programming in C# - Variables and Functions


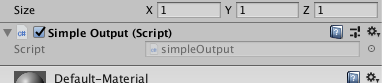


In this session I create a cube and added a C Script to it(Simple Output). I learned about the Start and Update function. I used different methods to print name, age in different ways and I also made use of the if statement to create a function that multiplies a number by 2.
If Statement


In this session I learned that I use the if statement for decision making based on conditions (true or false). My first try was creating a command that if the answer was true print eat if it was false print don't eat and the condition was set to true. Another command was set to if myspeed was 0 the console should print I am not moving, and if myspeed variable was set to something other than 0 nothing would happen. The else condition was added to the command in case the answer was false, it would print I am moving , instead of nothing happening.
Random numbers / Colour


In this session a script was added to a cube in order for commands to be passthrough. A variable that generates a random number was created and set to generate number between 0 and 10. The if statement was used to change the colour of the object based on the random number. The range of the numbers was between 0 to 3 (0 red, 2 blue and 2 green).
Input/Movement


For this session I created a3D cube object and add a C Script to it. After opening the script I added command that made sure every-time I pressed the space bar, a message would print in the console saying that the (Space button is pressed!). I added more instructions by changing the command to every time the space bar is pressed the cube would become green and red if it was down. By using the 3 parameters(X, Y, Z) I was able to increase and decrease their value to change direction. I int value was added to increase and decrease speed, the value was changed to public so it could be changed outside the script section. I was able to complete the task by creating a cube that navigates in 4 directions and duplicating the one original one into 3 that moved with different speeds.
Maze Game


In this session I imported assets to create a mini game. All 2D asset was set to sprite (2D an UI). The stones , Player, key, door and boxes were added to the scene and each were given different components. The aim of the session was to move the player in different directions and speed, enable him to collect the key and go thought the door when the player had the key. By using different types of value and statement for the c script I was able to achieve the expected result as shown above.
Rotation


I imported the assets into the 2D project that I created. I C script was added to the car asset added. The script shown above allowed the car to move vertically and horizontally.
bottom of page